Updated Pages - DIY Projects for the Garden, Worm Test!

Sunday, April 17, 2011

Keeping a Garden Journal


Keeping a garden journal, is so useful, I can"t even tell you! I had started mine many many moons ago, and really should start to update it again, because since then, i have spent 5 years adding more plants to my land that i even care to count. I find myself going back to this journal in search if info I had marked down on a specific plant, that i had long forgotten about.

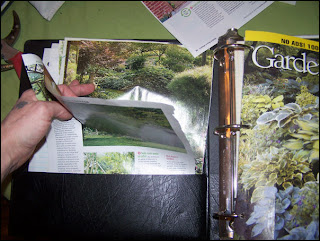
Your journal doesn't have to be fancy smancy, mine is just an old document folder, with paper in it and a few pockets. You can add or remove papers as you see fit. Kinda like a garden grimoire.

In my journal I have pictures of specific plants in my garden, and on the next page a few pieces of paper with the information i have observed about this plant growing in my garden, such as, when it blooms in my garden, how much sun it gets in a particular spot, and if I moved it, i mark down why i did, (maybe it wasn't getting enough sun or moisture in a certain spot, etc), where I got it from or who, if it can be divided or.....you get the idea!


I will rip out any inspirational pages from garden books, that I like. i might use the idea, or run with that idea into something else for my garden. Maybe I just like the way they planted their hostas...whatever...anything. Like that rickety ole arbor made from fallen branches, rip it out and save it for your journal, now you have a way to go back to it, if you decide you want to make one for your yard!


I also like to save the plant markers, that come with plants I have purchased. Just a handy dandy thing to have when your plant doesn't survive the winter and you cant remember the name of it!


So get those creative juices flowing and start that garden journal!

Jo.


Friday, April 15, 2011

Biennial in Review - Foxglove


(pictures from my foxglove, in my garden 2 seasons ago)

Digitalis Purpurea


I would have called the title to this post "perennial in review" But in all actuality, that would have been false. Foxglove is really a Biennial. Growing in it's first year, and flowering, then setting seed the following year.

This year I await a new batch of my foxglove to come up and flower again. There are also hybrids that will grow and flower in the same season, but my experience is, they just don't get as big and tall as the old cottage garden variety. So I stick to what I know works for me. I have the pink and white. Here is a little info on foxglove if you wish to give it a try and grow this old favorite cottage garden flower in your garden.


Care and Cultivation: Sun to part shade is best (mine get morning and noon sun, shade the rest of the day)
Fertile, compost rich soil, slightly acid. Plentiful moisture. Zones 4- 9

Plant container grown plants in spring, spacing about a foot apart (they do spread out and get quite leafy and big)
Start seeds indoors about 6 weeks before last frost date. Seeds need a chilling in the fridge before sowing, otherwise they wont sprout.


When done flowering, cut off stalks of ripened seed pods and sprinkle or shake out the seeds where you want them to grow the next season. Or allow to self sow. However i find it useful to just shake them out onto the soil. Make sure you mark where they are so as not to disturb the soil the next season until you see the sprouts emerging. (speaking from experience here, you may think you'll remember where they are, but chances are, you wont...LOL)

Don't let foxglove dry out completely when growing, they don't like it at all. Most foxglove will get anywhere between 3- to 5 feet tall, if your soil is 'the bomb', even taller. So it's best to put them in the back of the garden bed, or plant them solo to show off their beauty.


Jo.


Tuesday, April 12, 2011

DIY Project - Earthworm Test


Ever heard the ole saying, "If you have alot of earthworms in your garden, you have good soil"? Well it's true. Earthworms are a great indicator of the structure of your soil. Just one earthworm can swallow and process between 20 - 200 tons of soil per acre. That's alot of dirt!

Here's a little project you can do yourself to determine how your soil adds up.


Dig a 1 foot square hole in your garden about 6 inches deep, and place the soil into a shallow tray. (this is a fun project for the kids too!)


Next count the number of earthworms in the tray of soil.


1 earthworm means your garden soil needs work.
5 to 9 means it's almost there, but still needs more compost.
10 or more means happy soil life.

Use this above scale to asses the amount of organic matter in your garden soil, earthworms are great indicators to soil life.


Jo.


Wednesday, April 6, 2011

Paper or Plastic?


Nothing IRKS me more than being asked this question. I rarely go to our local grocery store, but when I absolutely have to, I stand in line, my cash in hand with a few items of necessity, and wait patiently for the lady with 5 kids to stop gabbing about everything under the sun, and approach the checkout only to be asked this question, "paper or plastic?"

Which wouldn't really bother me. It shouldn't right? A simple question to which a simple answer is given. Although 99.9% of the time, my answer falls on deaf ears. I bring my own machine washable fabric bags along with me, plenty of them if need be, only to have 1 fabric bag filled with 3 stinking items and the rest of my items put into plastic bags.....(cringes, bites lip, eye twitches, face beat red). Why? Because either they are to lazy too, it's more convenient for "them", or they assume my produce needs to be wrapped for some reason).

Frankly I have know clue, nor do I care anymore. This was the last straw, that broke the camels back per say, and I let the poor bag girl hear it. (Or the whole friggin store) I told her what part of that answer, did you not hear?  "I have my OWN bags"? I proceeded to take everything out of the plastic bags and put them into my own. This has happened just about every time i have went to the store. Their answer to my question, well we didn't want it to leak.....Um...that's why I have a washing machine? Ooooh my gosh, my vinegar bottle might leak, and do what? Pickle my whole wheat saltine crackers?

Honestly........It bugs me to no end! I do not like to bring plastic home...period, if I don't have to. I try and buy either glass or recycled paper when possible...yes i am a label reader. Both I can recycle, and yes i know most plastics are recyclable, but some are not, and frankly plastic bags are not, at least here they aren't recyclable. I cannot begin to tell you the many reasons to NOT use them. But I won't get preachy here.


I am by no means a tree hugging hippy as they like to call it up here, but I try and instill into my lil one that recycling and reusing, reducing, is far better for mother earth than we could possibly imagine. I know my gripe may seem trivial to most, but it makes my efforts, however small they may be, futile, when my words fall on deaf ears....uuuggghhhhh!

Plastics are the bane of human kind and the earth herself, among other things. So next time, the cashier and bag girl/guy ask you this question 


Enough said and my rant is over...hehehehe I will politely step off my soap box now.

Jo.


Sunday, April 3, 2011

Vegetable in Review - Onion


Allium Cepa


MMMMMMMMMmmmmmm mmm. Onions, gotta love'm! I use these in just about every meal I make. I have also grown just about every available variety there is. But only a handful I care to keep. I have grown the big reds, walla wallas, Egyptian walking onions, bunching etc. They are all great, but only a few really hold up to the good ol'e Wisconsin weather, and store well for me here. I am quite finicky about the storage part. I needed an onion that wasn't going to turn to mush within a few months of storage. For that I chose an onion called Copra. I am still using them, and I put them in storage around the end of September/beginning of November. Granted some of them are starting to sprout, but that is a long time to keep in storage. They have done well. Most are still very firm, even the ones with sprouts.

 On to the info!


Onions are a warm season vegetable. In Mid spring, when fairly warm plant your seedling that you may have started, or sets outdoors. Space them about 2- 5 inches apart, (I found this give them room to spread out). Harvest is anywhere between 75 to 100 hundred days depending on the variety you have gone with. (However some onions are cold hardy and will come back up in your garden next year if you have covered them, Egyptian walking onions are good for this, so are bunching onions) Onions are ready to harvest when the tops turn yellow and fall over.

Feed at planting time and once again during the growing season. Grow onions in full sun, which they appreciate, and soil heavy in compost doesn't hurt either. I had absolutely huge onions last fall, because I amended the bed before my onions were planted. Thrips and maggots are a few pests that effect onions, but can e avoided if crop rotation is used.


Harvesting : When I harvest my onions, I let the tops turn yellow and fall over. They are still fairly easy to pull out, but use a pitch fork to lightly lift them if need be. Have a place that you can set all your onions on, such as a picnic table, out of the scorching sun, perferably a fairly shady spot with some air movement. I lay my onions on the table to dry, leaving the dirt on them, as it is easier to brush the dirt off when it is completely dry. Let them dry for about a week, the skins will begin to get papery, the dirt will dry, the tops will dry up and look like leather shoestrings. (please keep in mind you might have to move them indoors if it rains, before the week drying time is over!)

Preparing them for storage: When they are dry, I have a bunch of plastic milk crates I got from the local market, that i will use to put the onions in after I have wiped them down and trimmed them up.


You can find them on the Internet fairly easy, or if you know a grocery store you can get them from, they might be happy to sell you some. Or you can find some here:

http://www.duluthtrading.com/store/product/milk-crate-85055.aspx?src=T11WFSHP1

The reason I use these crates is because they have lots of room for air movement. The last thing you need is to have all of your beautiful onion go rotton within a month because you didnt store them in the right container. Anything that has slats on all 4 sides will work.

I use a little pot scrubber with a handle, it has plastic bristles, you know the kind....I use this to brush the dirt off the onions to clean them, which works quite well. After I have cleaned all, I move to the trimming. I trim the roots off fairly close and the top of the onion stalk. I trim it to about and inch or so, leaving room for shrinkage. (I will be doing a how to video this fall on harvesting and keeping root vegetables and onions. So keep on a look out for that!)

I then throw the onions into the milk crates, and bring them into my basement, which is fairly cool, and put them into a room that is fairly dark as well. That's it...that's how you store onions. However, if you don't have a cool place such as a basement, you can also use a garage, as long as they are kept from freezing. and old working fridge can also be used, if you don't have space in your regular fridge for storing. This fridge can be used "just" for this purpose.


Jo.